

I have seen a lot of people remove the some drawers, painted the insides and placed their electronics in the holes like this.
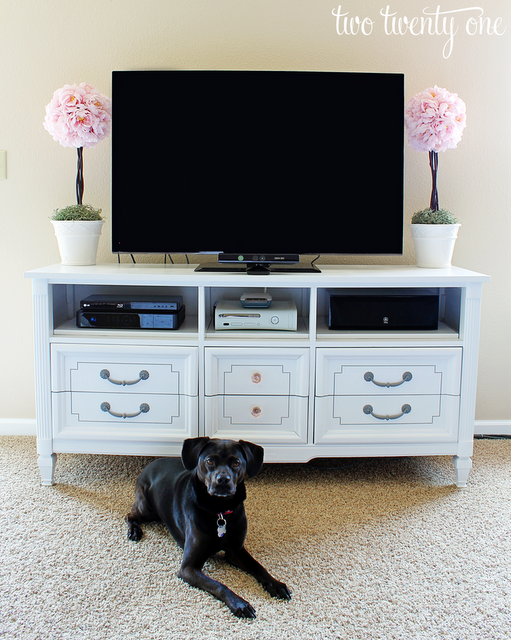

But I didn't want to remove any drawers. (I love the hardware too much) I just don't like that look and I thought it would take away from the piece. I know it is possible to wire the cable box into a near by closet. People do this if they are hanging a flat screen above a fireplace or something where they don't have a place to store the cable box. Problem with that is I don't have a near by closet. I have also heard of people placing their electronics inside a drawer and drilling holes in the back for the wires. My number one concern was keeping the integrity of the dresser. I didn't want to deface it because it's a beautiful mid-century piece...somewhat of an antique. I couldn't bring myself to drill holes in it. In addition, the man from Bright House said not to put it in the drawer because it would "catch fire." Not sure how true that is, but I could see the thing overheating being kept in a sealed drawer all the time.
I decided to take my own approach and remove the backs of the drawers so that the front would look the same, but the back would have plenty of ventilation.
Here is what I did:
1. Remove the back panel. This part was easy. I used a flat head to pry out a few staples on the same side and then gently pulled it away. The other staples just popped right out. I put the back panel in the garage in case I ever decide to turn it back into a traditional dresser.
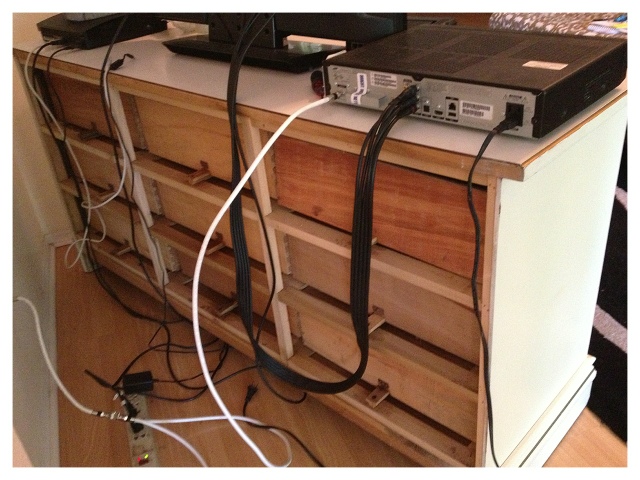 2. Pull out the drawers and examine how they are constructed. Mine had dovetail joints holding it together, so I had to remove the sides before I could remove the back. Use a hammer to lightly tap the pieces loose. I guess the glue that was holding it together had broken down over time because my pieces popped out easily.

3. Remove the back piece of each drawer. I used a screwdriver to pull the track off. Then squeezed that piece onto the bottom of the drawer and reattached the sides. (I saved the backs, so I can put it back together one day.)


4. Last step, put the drawers back in and place the electronics in through the back. It looks messy with wires everywhere, but it's the back - no one will see it.


I know you are wondering how the clicker works now that the cable box is hidden in the drawer. We ordered this infrared extender on Amazon.
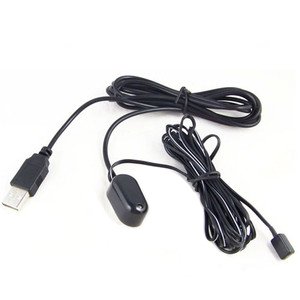
It plugs into the cable box. A little piece covers the sensor on the box.


It connects to the new sensor that you stick in a hidden spot on the TV.


Simple as that.
I didn't like how plane and small the TV looked all alone, so I framed the card I gave Mr. Wonderful on our wedding day. (I put his note to me and our vows inside, so if we need a reminder someday, we know where to find it)
 Isn't the frame pretty? My friend Kim was getting rid of it, so I took it. It goes great with the colors of the room.

Dang girl... you are SO crafty! And handy for that matter! The infared extender was a great idea! It looks awesome!
ReplyDeleteWow! Looks great! :)
ReplyDeleteAshley @ casa-de-castel.blogspot.com
Thank you Ashley. Thanks for stopping by :)
DeleteGenius and so sleek and gadget/clutter free! (And I love you call the remote a "clicker" - me, too!) I'm visiting from the Pinworthy Projects party at Just Us Four.
ReplyDeleteChristy @ Creating a Beautiful Life
Thanks for visiting Christy!
DeleteThat dresser is beautiful Pam! And I just love your new silverware!
ReplyDeleteAnnie XO
Gorgeous! I love how this looks. I am on the hunt for the right dresser to do this with for our family room but just haven't found it yet. Thanks so much for sharing this at the Pinworthy Projects Party.
ReplyDeleteYou did a beautiful job. Looking for a similar but taller dresser for our family room, also. Thanks for the tutorial.
ReplyDeleteHello, please attribute and link the third photo in your post to its proper source at http://www.thenorthendloft.com/2013/05/television-console.html or remove it. Thank you.
ReplyDeleteI removed the drawers and put them on the side bookcases, same width, sort of. Hardware still visible, but in different configuration. If I didn't have side bookcases, I don't think I would have missed the two drawers I removed from the cabinet. I don't like stuff on top surfaces so I like what you did, but there is still "clutter" on top. Honest critique, not being mean. I love the whole idea of a dresser used as a tv stand. You hit a home run there!!
ReplyDelete